 image © Prodos Games
Details
Miniature Set: Imperial Starter Box, Product Code: PIC101101, Species: Human, Series: Mutant Chronicles, Range: Mutant Chronicles (Prodos Games) (Futuristic fantasy), Company: Prodos Games, Production: -2016-2017-
Scale: 1:56 (28mm / 32mm), Proportions: Realistic, Size: ?mm high, Material: Resin, Priming: Primer is not necessary
Assembly: Multi-piece, Needs glue, On sprue, Needs cutting Posing: Medium, Paintjob: Unpainted, Base: No base, Sculptor: ?
 image © Prodos Games
Contents - Imperial Starter Box miniature set for Warzone Resurrection from Prodos Games
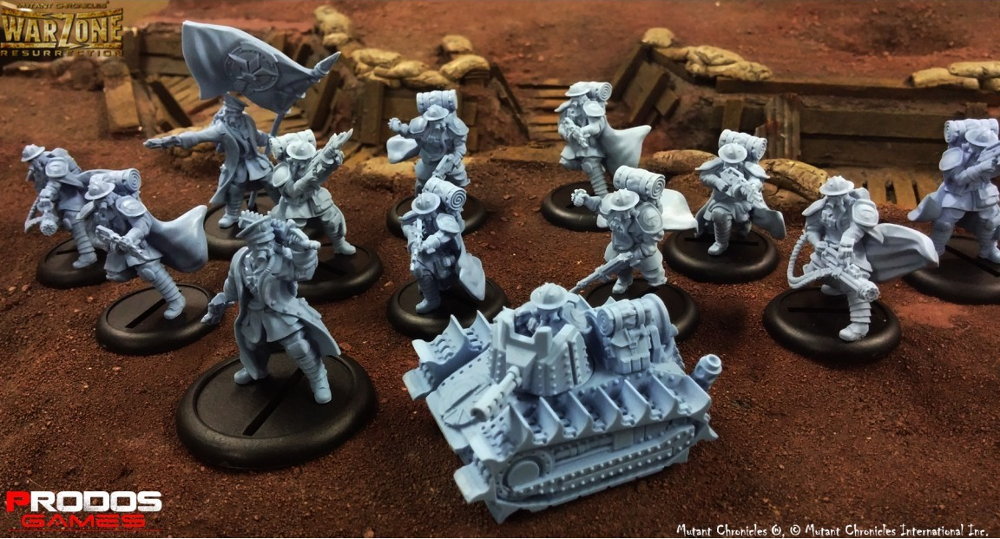 image © Prodos Games
Miniatures
1x Greyhound
2x Officers
10x Trenchers
1x 50mm base - slottabase with covered slot, black, round, lipped, magnet holder
2x 40mm base - slottabase with open slot, black, round, lipped
10x 30mm plastic base - slottabase with covered slot, black, round, lipped, magnet holder
System
2x d20 Dice
1x Imperial Card Deck (13 cards)
8x Resource card
5x Stat card
1x Greyhound
2x Officers
2x Trenchers
* * *
Review - Warzone Resurrection Starter Boxes
Warzone Resurrection miniatures from Prodos
According to the makers, you don't have to wash the models to clean the release agent. However, I tend to wash everything before painting, just to make sure it's clean.
As they are resin, polystyrene cement won't work on them - use superglue. I recommend liquid cyanoacrylate, as it sets very fast.
Some miniatures look to me as they are hydrophobic, and that's bad news for me as I tend to paint directly on plastic models, without primer. It seems it affects certain models, but not others. Anyway, to make your life easier, I recommend using a primer on every Warzone miniature, just to be on the safe side.
Warzone Resurrection Starter Boxes from Prodos
The outer box is thin sleeve, and it's hard to get the inner box out of it. If you get the inner box out, you probably won't put it on again. It seems to fit fine, but somehow doesn't work for me. The inner box is a thick cardboard box, great to protect the contents.
The whole box seems way too large for me, it's about 20x24cm. I could fit the contents of every starter set into the box of the Mule carrier (11,7x15,8cm), and that is about one third of the size of the starter boxes. Most of the problems came from the long sprues, but if they were packing the starters into the small boxes, they would just cut the ends of the sprues so they would fit in. The vehicle box has the same thin cover box, but as it's smaller, it's easier to remove it, so it's more reusable.
There are three versions of the starter boxes:
- v1 (2014.05-): Created for the Kickstarter. Cover art is painted, not related to content. Same cover sleeve as v2, but in the lower left corner it's indicated it has 75-76 cards inside. Beyond the miniatures, it contains 75-76 cards instead of the 12-13 cards in v2. It has the 4-5 Stat cards, 8 Resource cards, but also 41 Tactical cards, 10 Gear cards and 12 Strategy cards. These cards are 94x68 mm, that were changed later for a size that's easier to sleeve, in sold in MegaDecks. The bases are slotted.
- v2 (-2015.06-): Same cover sleeve as v1, but in the lower left corner it's indicated it has 12-13 cards inside. Beyond the miniatures it contains only 12-13 cards, the Stat Cards and the Resource cards, the rest of the cards you need come in the MegaDecks. Most of the bases have covered slots.
- v3 (-2017.01-): Cover art is a photo of the contents after painting. I think it has the same content as v2.
The packaging itself is somewhat random. The basic set up seems to be this:
- every set of miniatures in its own ziplok bag, either on sprue, or cut from sprue
- dice (two of the same, random colour) and bases in ziplok bag
- Resource card deck in ziplock bag, the Stat cards are either in this bag, or in the individual bags with the miniatures
- the empty space is filled with bubblewrap
However I've found some only half-filled with bubblewrap, and from those half-filled there were boxes, where minis were all put into one ziplok bag, or they were just poured into the box, with an empty bag put beside them. I have to admit no damage happened even with the resin parts freely wandering around the box.
I've seen several dice colours, I don't know what dictates the colour. Variations: black numbers on white, white numbers on red, red numbers on white, orange & green.
Trenchers
Trencher #1 throwing grenade
Trencher #2A running with large coat
Trencher #2B running with small coat
Trencher #3 with assault cannon
Trencher #4 standing
Trencher #5A kneeling with large coat
Trencher #5B kneeling with small coat
Cleaning them up was fine. I got my copies removed from the sprue, so I only had to remove the sprue remains and clean up the flash. Flash was minimal, most of them is on the insides of the coats that can't be seen and the imperfections of the coat in a battlefield condition can be understood.
The only thing I didn't like is that the running poses have the sprue channel on the soles of their running feet, so it's in a quite visible place. Removing that is somewhat difficult, as it's close to the coat. The pose with the larger coat is a bit better as the channel is on the tip of its boot, further from the coat.
I prefer my minis to show the way as they are preparing for the battle, with weapons in hand, showing what are they doing during the whole combat, instead of being right in the middle of an action. That's why the figure that is throwing a grenade doesn't really fit my taste, it looks to me as if that model is chucking grenades all the time during the game.
Possible improvements
- Make it easier to remove the running figures from the sprue - probably a channel into the tips of their boots instead of the soles?
- For me it would improve the minis, if the grenade throwing would be optional.
Trencher Officers
The officers have so many tiny detail on them, you should take a look at painted models, before you start painting them, so you won't miss any. They are very nice models.
Trencher Officer #1 with sword
Take care that although the left arm with the sword seems to be freely posed, there is an energy cable on its back that connects to its counterpart on the body. Unless you have some solution for this, or you don't care, you should know this when positioning the arm.
Trencher Officer #2 with banner
Cleaning them up was easy. I got my copies removed from the sprue, so I only had to remove the sprue remains and clean up the flash. There was no flash to speak of, only some thin resin membrane that was easily scraped off. The sprue channels were on places that are easy to remove.
All of the banner poles I have seen are bent the same way. I'm not sure this is by design, or coincidence.
On my copies, there is a sprue channel on the barrel and the magazine of their pistol. Take care when you cut them, not to cut into the barrel and the magazine itself.
Possible improvement
Put the sprue channel on parts that are not so similar to the channel itself, so it would be clear where to cut.
Greyhound AFV
There is one sculpt that got at least two versions of the cast.
v1: Tank body with exhaust pipes on, and a separate turret.
v2: Tank body without exhaust pipes, two exhaust pipes, and a separate turret. There are at least two different moulds for this, one with the turret towards the body, and one with the turret pointing away from the body. I prefer the latter as it's easier to remove the turret from the sprue with lesser chance to damage the main body.
Possible improvements
- Make the turret into two pieces, one with the armour and the controls, and one with the driver and the back of the turret. this way it will be easier to paint it, as now it's very difficult to reach the parts that are visible.
- Take off the two threads. It will make painting the tank easier.
- As the rules allow you to use a mortar instead of the gas gun, it would be nice to make the barrel of the weapon removable, even if there is no mortar included. This way I wouldn't have to cut the weapon, that could damage the piece.
- And while it's not a big thing, I'd prefer to have the backpack to be removable. My preference is that vehicles should be generic, with optional stowage if there is a need for it.
* * *
Resources - Imperial Starter Box miniature set for Warzone Resurrection from Prodos Games
Contents overview of Imperial Starter Box v1
GMort (from GMorts Chaotica): Unboxing Warzone Resurrection - Imperial Starter Set: Contents overview article with lots of photos, with ideas how to build a Warzone army using the miniatures.
* * *
Buying the product - Imperial Starter Box miniature set for Warzone Resurrection from Prodos Games
Base set price (Imperial Starter Box): 37,5 GBP / 45 EUR / 48 USD
Contains: 1x Greyhound (ca. 7,5 GBP), 2x Officers (? GBP), 2 x Trenchers set (2x14 GBP), 1x Imperial Resource Card Deck (2 GBP), 2 d20 (1 GBP) = ? GBP = ? %
EAN Code: 5060387160068
Prodos Games: Imperial Starter Box: Official page.
| Buy Imperial Starter for Warzone Resurrection from Prodos Games from Amazon |
| Amazon US - Amazon UK - Amazon CA - Amazon DE - Amazon FR - Amazon IT - Amazon ES |
| Buy Imperial Starter for Warzone Resurrection from Prodos Games on eBay |
| eBay US |
| Buy Imperial Starter from Element Games (UK) Buy Imperial Starter Box from Firestorm Games (UK)  -40% -40%Buy miniatures from Wayland Games (UK)  Buy miniatures from Forbidden Planet (UK) Buy miniatures from Magic Madhouse (UK)  Buy miniatures from Goblin Gaming (UK)  Buy Prodos products from Noble Knight Games (USA)  -10% -10%Buy miniatures from Galactic Toys (USA)  Buy board games from Book Depository Buy miniatures from Aliexpress (China) |
* * *
Do you have the Imperial Starter Box miniature set for Warzone Resurrection from Prodos Games? How do you like it? Would you recommend it to others? What further uses can you come up with? Tell your opinion in the comments!

")
Comments powered by CComment